August 19, 2021

How to install ansible on Oracle Linux 7


OS : OEL 7.9

Download EPEL Repo

You can download EPEL repo from this link

https://dl.fedoraproject.org/pub/epel/

To download directly in the server use wget command

[root@bastionhost opc]# wget https://dl.fedoraproject.org/pub/epel/epel-release-latest-7.noarch.rpm


Install EPEL repo


[root@bastionhost opc]# rpm -Uvh epel-release-latest-7.noarch.rpm

warning: epel-release-latest-7.noarch.rpm: Header V4 RSA/SHA256 Signature, key ID 352c64e5: NOKEY

Preparing...                          ################################# [100%]

Updating / installing...

   1:epel-release-7-13                ################################# [100%]


Install Anisble

[root@bastionhost opc]# yum install ansible

Loaded plugins: langpacks, ulninfo

https://ookla.bintray.com/rhel/repodata/repomd.xml: [Errno 14] HTTPS Error 403 - Forbidden

Trying other mirror.

epel/x86_64/metalink                                                                     | 8.4 kB  00:00:00

epel                                                                                     | 4.7 kB  00:00:00

(1/3): epel/x86_64/group_gz                                                              |  96 kB  00:00:00

(2/3): epel/x86_64/updateinfo                                                            | 1.0 MB  00:00:02

(3/3): epel/x86_64/primary_db                                                            | 6.9 MB  00:00:03

Resolving Dependencies

--> Running transaction check

---> Package ansible.noarch 0:2.9.18-1.el7 will be updated

---> Package ansible.noarch 0:2.9.24-2.el7 will be an update

--> Finished Dependency Resolution


Dependencies Resolved


================================================================================================================

 Package                   Arch                     Version                        Repository              Size

================================================================================================================

Updating:

 ansible                   noarch                   2.9.24-2.el7                   epel                    17 M


Transaction Summary

================================================================================================================

Upgrade  1 Package


Total download size: 17 M

Is this ok [y/d/N]: y

Downloading packages:

epel/x86_64/prestodelta                                                                  | 1.3 kB  00:00:00

warning: /var/cache/yum/x86_64/7Server/epel/packages/ansible-2.9.24-2.el7.noarch.rpm: Header V4 RSA/SHA256 Signature, key ID 352c64e5: NOKEY

Public key for ansible-2.9.24-2.el7.noarch.rpm is not installed

ansible-2.9.24-2.el7.noarch.rpm                                                          |  17 MB  00:00:06

Retrieving key from file:///etc/pki/rpm-gpg/RPM-GPG-KEY-EPEL-7

Importing GPG key 0x352C64E5:

 Userid     : "Fedora EPEL (7) <epel@fedoraproject.org>"

 Fingerprint: 91e9 7d7c 4a5e 96f1 7f3e 888f 6a2f aea2 352c 64e5

 Package    : epel-release-7-13.noarch (installed)

 From       : /etc/pki/rpm-gpg/RPM-GPG-KEY-EPEL-7

Is this ok [y/N]: y

Running transaction check

Running transaction test

Transaction test succeeded

Running transaction

Warning: RPMDB altered outside of yum.

  Updating   : ansible-2.9.24-2.el7.noarch                                                                  1/2

  Cleanup    : ansible-2.9.18-1.el7.noarch                                                                  2/2

  Verifying  : ansible-2.9.24-2.el7.noarch                                                                  1/2

  Verifying  : ansible-2.9.18-1.el7.noarch                                                                  2/2


Updated:

  ansible.noarch 0:2.9.24-2.el7


Complete!


Verify Anisble Version:-

[root@bastionhost opc]# ansible --version

ansible 2.9.24

  config file = /etc/ansible/ansible.cfg

  configured module search path = [u'/root/.ansible/plugins/modules', u'/usr/share/ansible/plugins/modules']

  ansible python module location = /usr/lib/python2.7/site-packages/ansible

  executable location = /bin/ansible

  python version = 2.7.5 (default, Nov 13 2020, 02:52:00) [GCC 4.8.5 20150623 (Red Hat 4.8.5-44.0.3)]


Installation complete. Ansible is ready to use.

August 6, 2021

Preclone on DBTier fails with RC-20010: Fatal: Could not find Info-ZIP's zip version 2.3 in the PATH

 While running adpreclone on DB Tier , it fails with error RC-20010: Fatal: Could not find Info-ZIP's zip version 2.3 in the PATH

Environment Details:-

Application Version

R12.1.1

DB Version

11.2.0.4

OS

RHEL 7


While running adpreclone on dbTier following error message is thrown

[orapay@ccuine EIILPAY_ccuine]$ perl adpreclone.pl dbTier 

                     Copyright (c) 2002 Oracle Corporation

                        Redwood Shores, California, USA 

                        Oracle Applications Rapid Clone 

                                 Version 12.0.0 

                      adpreclone Version 120.20.12010000.2 

Enter the APPS User Password:

  |      0% completed       RC-20010: Fatal: Could not find Info-ZIP's zip version 2.3 in the PATH. Please make sure you have zip version 2.3 in your PATH and rerun the command.zip 2.3 is normally available in $ORACLE_HOME/bin/ or it can be downloaded from http://www.info-zip.org/Zip.html 

ERROR while running Stage...

Fri Aug  6 22:14:12 2021 

ERROR while running perl /PAYROLL/EIILPAY/db/tech_st/11.2.0.4/appsutil/bin/adclone.pl java=/PAYROLL/EIILPAY/db/tech_st/11.2.0.4/jdk/jre mode=stage stage=/PAYROLL/EIILPAY/db/tech_st/11.2.0.4/appsutil/clone component=dbTier method=CUSTOM dbctx=/PAYROLL/EIILPAY/db/tech_st/11.2.0.4/appsutil/EIILPAY_ccuine105.xml showProgress ...


Reason:- The error is observed because Zip Version other zip version is installed in whereas adpreclone.pl is expecting ZIP version 2.3.

[orapay@ccuine105 ~]$ zip -v

Copyright (c) 1990-2008 Info-ZIP - Type 'zip "-L"' for software license.

This is Zip 3.0 (July 5th 2008), by Info-ZIP.

So the above output shows our server has zip version 3 installed. And adpreclone is looking for ver 2.3

Solution:-

Solution 1: Stay with zip 2.3 

1.1 download zip 2.3 from http://www.info-zip.org/ 

1.2 unzip this file to a directory

 1.3 Add this directory in the PATH variable (now 'which zip' should give this location).

 Please make sure you have zip version 2.3 in your PATH

 1.4 Re-run adpreclone.pl


Solution 2 : Use zip 3.0 

2.1 Take a backup of you environment 

2.2 Review readme of Patch : 9171651 and apply all pre-requisites 

2.3 Apply patch Patch : 9171651 R12 RAPIDCLONE CONSOLIDATED FIXES JUL/2010

2.4 Retry the adpreclone.pl 


Solution 3: Copy Zip from appstier

3.1 scp or copy zip v2.3 from the apps tier’s location $ORACLE_HOME/bin,

to /usr/bin location.

3.2Make sure to take a backup of original zip in /usr/zip. And then retry adpreclone. It should work.

Once done revert back to original zip version


July 17, 2021

Autoconfig error in 19C for txkCfgUtlfileDir.sh


Error Details:

Database was cloned from source to target environment. While running autoconfig in DB tier  autoconfig is failing with following error

 Environment Details:- 

Application : EBS R12.1.3

Database : 19.9.0

sh adautocfg.sh 

Enter the APPS user password:

The log file for this session is located at: /u01/ebsclone/db/tech_st/19.3.0/appsutil/log/EBSCLONE_ccuine105/07172228/adconfig.log


AutoConfig is configuring the Database environment...

….

….

Updating rdbms version in Context file to db19

Updating rdbms type in Context file to 64 bits

Configuring templates from ORACLE_HOME ...


AutoConfig completed with errors.


Logfiles shows:-


[CVM Error Report]

The following report lists errors encountered during CVM Phase

      <filename>  <return code where appropriate>

  /u01/ebsclone/db/tech_st/19.3.0/appsutil/bin/txkCfgUtlfileDir.sh  1


No of scripts failed in CVM phase: 1


AutoConfig is exiting with status 1


Solution:-

First make sure following directories exist in target location. If its not present, create them.


<19c Oracle Base>/temp/<PDB NAME>

<19c ORACLE_HOME>/appsutil/outbound/<context name>


Make sure $APPLPTMP value in application tier is referenced in utl_file_dir supplemental parameter. The path should be correct

and should be the first entry in utl_file_dir supplemental parameter.


[ebscloneapp@ccuine105 EBSCLONE_ccuine106]$ echo $APPLPTMP

/ebs/EBS19C/db/tech_st/temp/EBS19C


mkdir -p /u01/ebsclone/db/tech_st/temp/EBSCLONE


[ebsclonedb@ccuine105 19.3.0]$ . EBSCLONE_ccuine105.env

[ebsclonedb@ccuine105 19.3.0]$ sqlplus apps/apps@EBSCLONE


SQL> select value from v$parameter where name='utl_file_dir';


VALUE

--------------------------------------------------------------------------------

/ebs/EBS19C/db/tech_st/temp/EBS19C,/ebs/EBS19C/db/tech_st/temp/EBS19C,

,/usr/tmp/GSTR1_File_Backup,/usr/tmp/PREFERRED/OUT/NEW,/tmp,/usr/tmp/ewaybill,/var/tmp,/u01/ebsc

lone/db/tech_st/temp/EBSCLONE


Now, since we cloned this instance from a source instance, there are many paths that dont exist in this server.

So we need to remove them from database else  txkCfgUtlfileDir script will fail during syncronization phase.


First, retrieve the list of directory paths that are currently stored in the UTL_FILE_DIR supplemental parameter. To do so,

source the PDB environment file and then run the txkCfgUtlfileDir.pl script in getUtlFileDir mode using the following commands:


[ebsclonedb@ccuine105 19.3.0]$ . EBSCLONE_ccuine105.env


[ebsclonedb@ccuine105 dbs]$ perl $ORACLE_HOME/appsutil/bin/txkCfgUtlfileDir.pl -contextfile=$CONTEXT_FILE -oraclehome=$ORACLE_HOME -outdir=$ORACLE_HOME/appsutil/log -mode=getUtlFileDir -servicetype=onpremise

Enter the APPS Password:


*** ALL THE FOLLOWING FILES ARE REQUIRED FOR RESOLVING RUNTIME ERRORS

*** Log File = /u01/ebsclone/db/tech_st/19.3.0/appsutil/log/TXK_UTIL_DIR_Sat_Jul_17_23_05_17_2021/txkCfgUtlfileDir.log

Program :  started @ Sat Jul 17 23:05:19 2021


*** Log File = /u01/ebsclone/db/tech_st/19.3.0/appsutil/log/TXK_UTIL_DIR_Sat_Jul_17_23_05_17_2021/txkCfgUtlfileDir.log


Script Name    : txkCfgUtlfileDir.pl

Script Version : 120.0.12010000.9

Started        : Sat Jul 17 23:05:20 IST 2021


Log File       : /u01/ebsclone/db/tech_st/19.3.0/appsutil/log/TXK_UTIL_DIR_Sat_Jul_17_23_05_17_2021/txkCfgUtlfileDir.log


Context file: /u01/ebsclone/db/tech_st/19.3.0/appsutil/EBSCLONE_ccuine105.xml exists.


==============================================================================


Successfully generated the below file with UTL_FILE_DIR content:

/u01/ebsclone/db/tech_st/19.3.0/dbs/EBSCLONE_utlfiledir.txt


==============================================================================


Completed        : Sat Jul 17 23:05:22 IST 2021


Successfully Completed the script

ERRORCODE = 0 ERRORCODE_END


Edit the created EBSCLONE_utlfiledir.txt file, as this contains all the directories list.

Remove and add any directories as per your requirement. Make sure if any directory is being added they are physically

present in the server. Also , if  deleting any directory they should not be referenced by application.


run the txkCfgUtlfileDir.pl script in setUtlFileDir mode using the following command:


ebsclonedb@ccuine105 dbs]$ perl $ORACLE_HOME/appsutil/bin/txkCfgUtlfileDir.pl -contextfile=$CONTEXT_FILE -oraclehome=$ORACLE_HOME -outdir=$ORACLE_HOME/appsutil/log -mode=setUtlFileDir -servicetype=onpremise

Enter the APPS Password:


Enter the SYSTEM Password:


*** ALL THE FOLLOWING FILES ARE REQUIRED FOR RESOLVING RUNTIME ERRORS

*** Log File = /u01/ebsclone/db/tech_st/19.3.0/appsutil/log/TXK_UTIL_DIR_Sat_Jul_17_23_08_56_2021/txkCfgUtlfileDir.log

Program :  started @ Sat Jul 17 23:09:02 2021


*** Log File = /u01/ebsclone/db/tech_st/19.3.0/appsutil/log/TXK_UTIL_DIR_Sat_Jul_17_23_08_56_2021/txkCfgUtlfileDir.log


Script Name    : txkCfgUtlfileDir.pl

Script Version : 120.0.12010000.9

Started        : Sat Jul 17 23:09:02 IST 2021


Log File       : /u01/ebsclone/db/tech_st/19.3.0/appsutil/log/TXK_UTIL_DIR_Sat_Jul_17_23_08_56_2021/txkCfgUtlfileDir.log


Context file: /u01/ebsclone/db/tech_st/19.3.0/appsutil/EBSCLONE_ccuine105.xml exists.


Value for s_applptmp on Apps Tier nodes is valid


Completed        : Sat Jul 17 23:09:07 IST 2021


Successfully Completed the script

ERRORCODE = 0 ERRORCODE_END


 copy $ORACLE_HOME/jdk/jre folder inside $ORACLE_HOME/appsutil directory.

[oracle@ccuine106 jdk]$ cd $ORACLE_HOME/jdk

[oracle@ccuine106 jdk]$ cp -rpf jre/ $ORACLE_HOME/appsutil/


Finally, synchronize the modified UTL_FILE_DIR value with the database context file.


Source PDB Environment file

[ebsclonedb@ccuine105 19.3.0]$ . EBSCLONE_ccuine105.env


[ebsclonedb@ccuine105 ebsclone]$ perl $ORACLE_HOME/appsutil/bin/txkCfgUtlfileDir.pl -contextfile=$CONTEXT_FILE -oraclehome=$ORACLE_HOME -outdir=$ORACLE_HOME/appsutil/log -mode=syncUtlFileDir

Enter the APPS Password:


*** ALL THE FOLLOWING FILES ARE REQUIRED FOR RESOLVING RUNTIME ERRORS

*** Log File = /u01/ebsclone/db/tech_st/19.3.0/appsutil/log/TXK_UTIL_DIR_Sat_Jul_17_23_14_41_2021/txkCfgUtlfileDir.log

Program :  started @ Sat Jul 17 23:14:42 2021


*** Log File = /u01/ebsclone/db/tech_st/19.3.0/appsutil/log/TXK_UTIL_DIR_Sat_Jul_17_23_14_41_2021/txkCfgUtlfileDir.log


Script Name    : txkCfgUtlfileDir.pl

Script Version : 120.0.12010000.9

Started        : Sat Jul 17 23:14:42 IST 2021


Log File       : /u01/ebsclone/db/tech_st/19.3.0/appsutil/log/TXK_UTIL_DIR_Sat_Jul_17_23_14_41_2021/txkCfgUtlfileDir.log


Context file: /u01/ebsclone/db/tech_st/19.3.0/appsutil/EBSCLONE_ccuine105.xml exists.

Execute SYSTEM command : /u01/ebsclone/db/tech_st/19.3.0/perl/bin/perl /u01/ebsclone/db/tech_st/19.3.0/appsutil/bin/adconfig.pl -contextfile=/u01/ebsclone/db/tech_st/19.3.0/appsutil/EBSCLONE_ccuine105.xml ************** -log=/u01/ebsclone/db/tech_st/19.3.0/appsutil/log/TXK_UTIL_DIR_Sat_Jul_17_23_14_41_2021/acfg_log_Sat_Jul_17_23_14_41_2021.log


The log file for this session is located at: /u01/ebsclone/db/tech_st/19.3.0/appsutil/log/TXK_UTIL_DIR_Sat_Jul_17_23_14_41_2021/acfg_log_Sat_Jul_17_23_14_41_2021.log


AutoConfig is configuring the Database environment...


AutoConfig will consider the custom templates if present.

        Using ORACLE_HOME location : /u01/ebsclone/db/tech_st/19.3.0

        Classpath                   : :/u01/ebsclone/db/tech_st/19.3.0/jdbc/lib/ojdbc8.jar:/u01/ebsclone/db/tech_st/19.3.0/appsutil/java/xmlparserv2.jar:/u01/ebsclone/db/tech_st/19.3.0/appsutil/java:/u01/ebsclone/db/tech_st/19.3.0/jlib/netcfg.jar:/u01/ebsclone/db/tech_st/19.3.0/jlib/ldapjclnt19.jar


        Using Context file          : /u01/ebsclone/db/tech_st/19.3.0/appsutil/EBSCLONE_ccuine105.xml


Context Value Management will now update the Context file


        Updating Context file...COMPLETED


        Attempting upload of Context file and templates to database...COMPLETED


Updating rdbms version in Context file to db19

Updating rdbms type in Context file to 64 bits

Configuring templates from ORACLE_HOME ...


AutoConfig completed successfully.


Completed        : Sat Jul 17 23:15:11 IST 2021


Successfully Completed the script

ERRORCODE = 0 ERRORCODE_END


Now re run autoconfig on DB Tier again and it should successfully run.

May 8, 2021

Oracle Enterprise Manager Cloud Control 13c Release 5 (13.5.0.0.0) Installation on Windows server 2019


Oracle Enterprise Manager Cloud Control 13c Release 5 (13.5.0.0.0) Installation on Windows server 2019

Environment Details

Hostname

TSTAPP-WLS.amana.com

OMS DB Version

19.3.0

OEM Version

13.5.0.0.0

OS

Windows Server 2019

OMS Home

D:\app\middleware

Agent Home

D:\app\agent


Download Oracle Enterprise Manager Cloud Control 13c Release 5 (13.5.0.0.0)

URL:- https://www.oracle.com/enterprise-manager/downloads/cloud-control-downloads.html


Download Oracle Database 19c (19.3) for Windows 64bit

URL :- https://www.oracle.com/in/database/technologies/oracle19c-windows-downloads.html


Install Oracle Database 19c (19.3) for Windows 64bit

At present I don’t have any blog post for Oracle Database 19c installation on windows platform . I will create a post on this later. You can find installation and configuration steps for oracle database in google. 

However I have installation and configuration document for Linux. You can find it here.


Configure OMS Database parameters

SQL> alter system set "_allow_insert_with_update_check"=true scope=both;

 System altered. 

SQL> alter system set session_cached_cursors=200 scope=spfile;

 System altered.

 SQL> alter system set shared_pool_size=600M scope=spfile;

 System altered.

 SQL> alter system set processes=600 scope=spfile;

 System altered.


Install EM Cloud Control 13c Release 5 (13.5.0.0.0)

Do not unzip the downloaded OEM software.

Run setup file as Administrator

Create directories for middleware home, agent  home as mentioned above.


Click on Advanced install


Select Skip , for skipping the updates


Click next on prerequisites check page. Check the result carefully, fix any issues that are shown as error


Provide Middleware Home Location, Agent Base Directory and Host name .

Note: Provide hostname as fully qualified host name only. Providing short hostname might cause issues during installation.


Select the required plugins are per your requirement and click Next.


Provide information as shown below and click Next.


Provide Database host name, port, SID , system password and Deployment size and click Next.


This screen shot the lists of prerequisites for database. If any of the status is not succeeded, use the auto fix option to fix it and click Next.


Information about character set , as oracle recommends using AL32UTF8 for OMS DB.


Provide below information as shown in image and Click on Next.


Select Configure Oracle software Library and click on Next


Information about port configuration are shown below. Click on Next.


Click on Next


The installation took around 5 hours to complete for me.


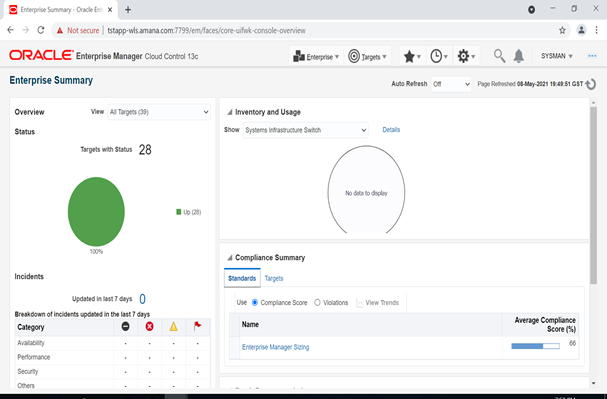
Open Enterprise Manager Cloud Control from browser

username: sysman

password : as given earlier

url: Take a note of url shown in above screen.


April 6, 2021

How to enable Diagnostic option in EBS R12.2


 To enable Diagnostic option in EBS R12.2  perform the following steps.

Steps 1


Navigate to System Administrator responsibility> Profile> System>


Steps 2

Enter profile name: Utilities:Diagnostics

Application User for whom you want to enable Diagnostics and tick on user option -> Find


Steps 3


Set Yes at User level and Save the Changes. You can keep Yes at Site level also if you wish to enable this setting for all other application users. Click on save.


Steps 4


Now again, navigate to System Administrator responsibilityProfileSystem

Enter profile name: Hide Diagnostics menu entry

Enter Application User for whom you do not want to hide Diagnostics menu entry


Steps 5


Set No at User level and Save the Changes. If you wish to apply the same for all other application users, you can set No at site level.


Steps 6


Once done, Log off from application and relogin. Now you would be able to see Diagnostics option


Oracle Database 26ai Installation Using RPM on Oracle Linux 9 (OEL 9) – Step-by-Step Guide

  In this post I will describe the installation of Oracle Database 26ai 64-bit on Oracle Linux 9 (OL8) 64-bit. The installation requires a m...