May 8, 2021

Oracle Enterprise Manager Cloud Control 13c Release 5 (13.5.0.0.0) Installation on Windows server 2019


Oracle Enterprise Manager Cloud Control 13c Release 5 (13.5.0.0.0) Installation on Windows server 2019

Environment Details

Hostname

TSTAPP-WLS.amana.com

OMS DB Version

19.3.0

OEM Version

13.5.0.0.0

OS

Windows Server 2019

OMS Home

D:\app\middleware

Agent Home

D:\app\agent


Download Oracle Enterprise Manager Cloud Control 13c Release 5 (13.5.0.0.0)

URL:- https://www.oracle.com/enterprise-manager/downloads/cloud-control-downloads.html


Download Oracle Database 19c (19.3) for Windows 64bit

URL :- https://www.oracle.com/in/database/technologies/oracle19c-windows-downloads.html


Install Oracle Database 19c (19.3) for Windows 64bit

At present I don’t have any blog post for Oracle Database 19c installation on windows platform . I will create a post on this later. You can find installation and configuration steps for oracle database in google. 

However I have installation and configuration document for Linux. You can find it here.


Configure OMS Database parameters

SQL> alter system set "_allow_insert_with_update_check"=true scope=both;

 System altered. 

SQL> alter system set session_cached_cursors=200 scope=spfile;

 System altered.

 SQL> alter system set shared_pool_size=600M scope=spfile;

 System altered.

 SQL> alter system set processes=600 scope=spfile;

 System altered.


Install EM Cloud Control 13c Release 5 (13.5.0.0.0)

Do not unzip the downloaded OEM software.

Run setup file as Administrator

Create directories for middleware home, agent  home as mentioned above.


Click on Advanced install


Select Skip , for skipping the updates


Click next on prerequisites check page. Check the result carefully, fix any issues that are shown as error


Provide Middleware Home Location, Agent Base Directory and Host name .

Note: Provide hostname as fully qualified host name only. Providing short hostname might cause issues during installation.


Select the required plugins are per your requirement and click Next.


Provide information as shown below and click Next.


Provide Database host name, port, SID , system password and Deployment size and click Next.


This screen shot the lists of prerequisites for database. If any of the status is not succeeded, use the auto fix option to fix it and click Next.


Information about character set , as oracle recommends using AL32UTF8 for OMS DB.


Provide below information as shown in image and Click on Next.


Select Configure Oracle software Library and click on Next


Information about port configuration are shown below. Click on Next.


Click on Next


The installation took around 5 hours to complete for me.


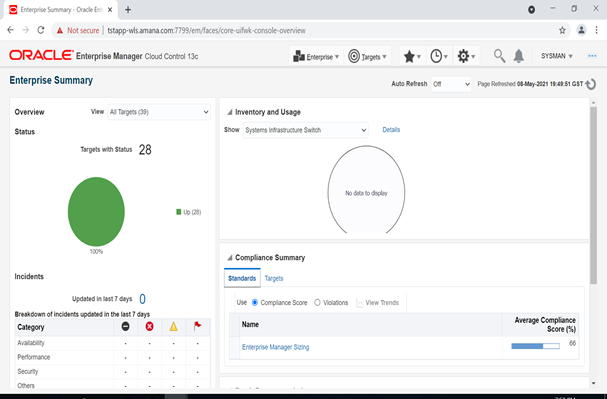
Open Enterprise Manager Cloud Control from browser

username: sysman

password : as given earlier

url: Take a note of url shown in above screen.


April 6, 2021

How to enable Diagnostic option in EBS R12.2


 To enable Diagnostic option in EBS R12.2  perform the following steps.

Steps 1


Navigate to System Administrator responsibility> Profile> System>


Steps 2

Enter profile name: Utilities:Diagnostics

Application User for whom you want to enable Diagnostics and tick on user option -> Find


Steps 3


Set Yes at User level and Save the Changes. You can keep Yes at Site level also if you wish to enable this setting for all other application users. Click on save.


Steps 4


Now again, navigate to System Administrator responsibilityProfileSystem

Enter profile name: Hide Diagnostics menu entry

Enter Application User for whom you do not want to hide Diagnostics menu entry


Steps 5


Set No at User level and Save the Changes. If you wish to apply the same for all other application users, you can set No at site level.


Steps 6


Once done, Log off from application and relogin. Now you would be able to see Diagnostics option


March 29, 2021

How to change APPLSYSPUB password in EBS R 12.2


After implementing PASSWORD_LIFE_TIME TO 30 DAYS for default profile, applsyspub user’s password was expired after 30 days.

Following error is observed after logging in to application,


Solution:-

We altered the profile of APPLSYSPUB user from default to EBS_APPS and rested the password of APPLSYSPUB user.

SQL> SELECT USERNAME,ACCOUNT_STATUS,EXPIRY_DATE,PROFILE FROM DBA_USERS WHERE USERNAME='APPLSYSPUB';

USERNAME             ACCOUNT_STATUS       EXPIRY_DATE     PROFILE

-------------------- -------------------- --------------- -------------------------

APPLSYSPUB           EXPIRED              27-MAR-21       DEFAULT


SQL>  ALTER USER APPlSYSPUB PROFILE EBS_APPS;


User altered.


·       Shutdown application service.


[appltest@vm1test scripts]$ cd $ADMIN_SCRIPTS_HOME

[appltest@vm1test scripts]$ adstpal.sh


·       Reset APPLSYSPUB password using FNDCPASS OR AFPASSWD .

Note:- APPLSYSPUB password must be in UPPER CASE due to internal code dependencies.

[appltest@vm1test scripts]$ AFPASSWD -c APPS -o applsyspub

Enter the ORACLE password of Application Object Library 'APPSUSER':

Connected successfully to APPS.

Enter the password for your 'SYSTEM' ORACLE schema:

Enter the password for your 'SYSTEM' ORACLE schema:

Connected successfully to SYSTEM.

Log file: AFPWD_TEST_042697.log

Enter new password for user [applsyspub]:

Verify new password for user [applsyspub]:


·       Make following changes in application context file.

Take a backup of application context file.


[appltest@vm1test scripts]$ cp $CONTEXT_FILE  TEST_vm1test.xml_bkp

[appltest@vm1test scripts]$ vi $CONTEXT_FILE

Look for following parameter s_gwyuid and s_gwyuid_pass


Make changes like this

From

<GWYUID oa_var="s_gwyuid">APPLSYSPUB/PUB</GWYUID>


To

<GWYUID oa_var="s_gwyuid">APPLSYSPUB/NEWAPPLSYSPUBPASSWD</GWYUID>


From


<password oa_var="s_gwyuid_pass">PUB</password>


To

<password oa_var="s_gwyuid_pass"> NEWAPPLSYSPUBPASSWD </password>


·       Run autoconfig on application tier

[appltest@vm1test scripts]$ sh adautocfg.sh


·       Start application  and now error should be resolved.


March 11, 2021

Various OCI CLI command for OCI Object Storage administration


·       Command to create bucket

Syntax:

oci os bucket create --compartment-id <compartment id> --name <bucket name>


Example:

oci os bucket create --compartment-id ocid1.compartment.oc1..aaaaaaaacgen54z6eyimw7pnp4a553425kifsq --name TESTBUCKET


·       Command to delete bucket

Syntax :

oci os bucket delete --name <Bucket name>


Example :

oci os bucket delete --name TESTBUCKET


·       Command to list out all the objects inside a bucket

Syntax:

oci os object list --bucket-name < Bucket name >             


Example:

oci os object list --bucket-name TESTBUCKET     


·       Command to upload files inside a bucket.

Syntax:

oci os object put –bn <Bucket_Name> --name <uploaded file_name > --file<source file_name>


Example:

oci os object put -bn TESTBUCKET --name x.sql --file x.sql


·       Command to upload files inside a directory created under a bucket.

Syntax:

oci os object put –bn <Bucket Name> --name <Direcotry name/uploaded file name> --file <source file name>


Example:

oci os object put -bn TESTBUCKET --name Backup/x.sql --file x.sql


·       Command to Download a file residing inside a bucket.

Syntax:

oci os object bulk-download –bn <Bucket Name> --download-dir <Path where file would be downloaded> --prefix <File which would be downloaded>


Example:

oci os object bulk-download -bn TESTBUCKET --download-dir /home/oracle --prefix x.sql


·       Command to Download files from a directory which is created under a bucket.

Syntax:

oci os object bulk-download –ns <Bucket namespace> -bn <Bucket Name> --download-dir

<Path where file would be downloaded> --prefix <Directory path/file name which would be downloaded>


Example:

oci os object bulk-download -ns bm1uufa0a -bn TESTBUCKET --download-dir /home/oracle --prefix Backup/x.sql


 Command to Download all files from a bucket

Syntax:

oci os object bulk-download –ns <Bucket namespace> -bn <Bucket Name> --download-dir <Path where file would be downloaded>


oci os object bulk-download -ns bm642gedufa0a -bn TESTBUCKET --download-dir /home/oracle

·     

  Command to delete file from bucket

Syntax:

oci os object delete -bn <Bucket Name> --object-name <Name of object to delete>


Example:

oci os object delete -bn TESTBUCKET --object-name t1.sql


·       Command to delete file from a folder residing inside bucket

Syntax:

oci os object delete -bn <Bucket Name> --object-name <Location from where file to be delete>


Example:

oci os object delete -bn TESTBUCKET --object-name Backup/x.sql


Command to find out all of the in-progress multipart uploads

Syntax:-

oci os multipart list --namespace-name <Bucket_Namespace> –bn <Bucket_Name>


 Example:

oci os multipart list --namespace-name lsaf54dfae -bn TESTBUCKET


Command to abort or remove in-progress multipart uploads

Syntax:-

oci os multipart abort -bn <Bucket_name> --object-name <object_name> --upload-id <upload_ID>

 Example:-

oci os multipart abort -bn TESTBUCKET --object-name PROD_backup_12042021/rman_bkp_9.tar.gz --upload-id 941a510d-37ec-2ddb-8b63-112634475f52


Oracle Database 26ai Installation Using RPM on Oracle Linux 9 (OEL 9) – Step-by-Step Guide

  In this post I will describe the installation of Oracle Database 26ai 64-bit on Oracle Linux 9 (OL8) 64-bit. The installation requires a m...