How to mount OCI object storage as a file system


In this topic I will show how to easily mount an object storage as a file system in any linux system.

In this case I am using a machine that is running on OEL 7

Step 1. Firstly, we will need to create a bucket in OCI. The steps of bucket creation is given in this post.

Step 2. Install s3fs-fuse rpm

[root@bastionhost opc]# yum install s3fs-fuse

.....

.....

Installed:

  s3fs-fuse.x86_64 0:1.86-2.el7

Dependency Installed:

  mailcap.noarch 0:2.1.41-2.el7

Complete!

[root@bastionhst opc]#


Step 3. Generate secret keys

Login to OCI console 

Click on User Settings


Under Resources section click on Customer Secret Keys


Click on Generate Secret key to generate secret keys


Provide a name for the key.


This will generate key , it’s important to save the key as it won’t be shown again.


The S3 credentials are created by using an access key and the secret key. The access key is displayed in the Customer Secret Keys area of the Console.


Step 4. Enter your credentials in a ${HOME}/.passwd-s3fs file and set owner-only permissions:

Run this from root user. 
echo ACCESS_KEY_ID:SECRET_ACCESS_KEY > ${HOME}/.passwd-s3fs

Here for  ACCESS_KEY you can get it from Generate secret key page.
For SECRET_ACCESS_KEY , we already saved it while generating it in previous step

Example:-
echo xxxxxxxxxxxxxxxxxxx:yyyyyyyyyyyyyyyyyyyyyyy > ${HOME}/.passwd-s3fs

in this example xxxxxxxxxxxxxxxxx is access key and yyyyyyyyyyyyyyyyy is secret key.

Once password file is created assign proper permission to it 
chmod 600 ${HOME}/.passwd-s3fs

Step 5. Create a directory to mount the storage and mount the object storage
mkdir /s3bucket

To mount the object storage use the following command:-

s3fs [bucket_name] [destination directory] -o endpoint=[region] -o passwd_file=${HOME}/.passwd-s3fs -o url=https://[namespace of object storage].compat.objectstorage.[region].oraclecloud.com/ -onomultipart -o use_path_request_style

example:-
s3fs test_bucket /s3bucket -o endpoint=ap-mumbai-1 -o passwd_file=${HOME}/.passwd-s3fs -o url=https://bm626z56fa0a.compat.objectstorage.ap-mumbai-1.oraclecloud.com/  -onomultipart -o use_path_request_style


Here test_bucket is our bucket name
/s3bucket denotes the local mount point where the object storage is mounted
bm626z56fa0a – this denotes the namespace of the object storage.

Step 6. Verify the mount point

[root@s3bucket]# df -h /s3bucket/
Filesystem      Size  Used Avail Use% Mounted on
s3fs            256T     0  256T   0% /s3bucket
[root@ s3bucket]#

To mount the object storage when system reboots, add the following line in /etc/fstab file.

s3fs#test_bucket /s3bucket fuse _netdev,allow_other,use_path_request_style,passwd_file=/root/.passwd-s3fs,url=https://bm626z56fa0a.compat.objectstorage.ap-mumbai-1.oraclecloud.com 0 0

How to create object storage in OCI

In this topic I will show how to create an object storage in OCI 


In OCI there are two kind of object storage available.

  • Standard Object storage : The standard object storage is used where we need access the data very fast and in a frequent manner.

  • Archive Object Storage:  As the name suggests, this type of storage is used for archiving process , where the data is accessed rarely and kept for long time.   

To create an object storage in OCI


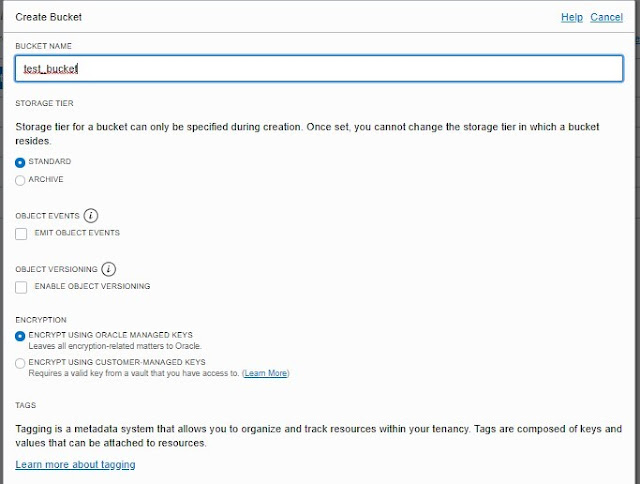
Click on Create bucket


Provide details for bucket creation.


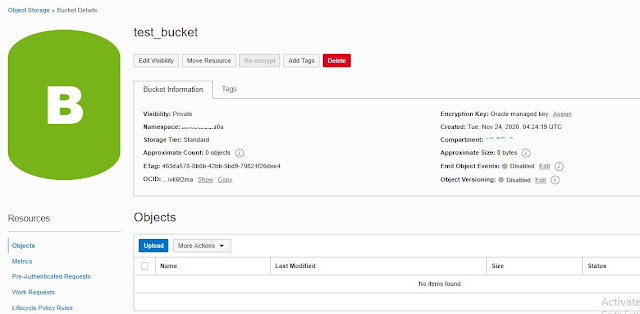
Take a note of namespace value.


So the bucket is now created, we can now upload the files into bucket.


We can also upload files directly to bucket from server level using CLI . I have shared the steps in this post.


How to upload files from on premise to object storage using OCI CLI

In this topic I would explain how to upload files from on premise machine to oracle cloud using CLI. Many customers like to place their on premise backup into cloud object storage for various reasons. In this post I would share the steps of how to upload the files into OCI object storage.


Step 1

Install the CLI:-

[root@server1]## bash -c "$(curl -L https://raw.githubusercontent.com/oracle/oci-cli/master/scripts/install/install.sh)"

  % Total    % Received % Xferd  Average Speed   Time    Time     Time  Current

                                 Dload  Upload   Total   Spent    Left  Speed

100 16053  100 16053    0     0  26111      0 --:--:-- --:--:-- --:--:-- 26144


    ******************************************************************************

    You have started the OCI CLI Installer in interactive mode. If you do not wish

    to run this in interactive mode, please include the --accept-all-defaults option.

    If you have the script locally and would like to know more about

    input options for this script, then you can run:

    ./install.sh -h

    If you would like to know more about input options for this script, refer to:

    https://github.com/oracle/oci-cli/blob/master/scripts/install/README.rst

    ******************************************************************************

Downloading Oracle Cloud Infrastructure CLI install script from https://raw.githubusercontent.com/oracle/oci-cli/v2.14.4/scripts/install/install.py to /tmp/oci_cli_install_tmp_tA9G.

######################################################################## 100.0%

Running install script.

python3 /tmp/oci_cli_install_tmp_tA9G

-- Verifying Python version.

-- Python version 3.6.8 okay.


===> In what directory would you like to place the install? (leave blank to use '/root/lib/oracle-cli'):

-- Creating directory '/root/lib/oracle-cli'.

-- We will install at '/root/lib/oracle-cli'.


===> In what directory would you like to place the 'oci' executable? (leave blank to use '/root/bin'):

-- Creating directory '/root/bin'.

-- The executable will be in '/root/bin'.


===> In what directory would you like to place the OCI scripts? (leave blank to use '/root/bin/oci-cli-scripts'):

-- Creating directory '/root/bin/oci-cli-scripts'.

-- The scripts will be in '/root/bin/oci-cli-scripts'.


===> Currently supported optional packages are: ['db (will install cx_Oracle)']

What optional CLI packages would you like to be installed (comma separated names; press enter if you don't need any optional packages)?:

-- The optional packages installed will be ''.

-- Trying to use python3 venv.

-- Executing: ['/bin/python3', '-m', 'venv', '/root/lib/oracle-cli']

-- Executing: ['/root/lib/oracle-cli/bin/pip', 'install', '--upgrade', 'pip']

Collecting pip

  Downloading https://files.pythonhosted.org/packages/cb/28/91f26bd088ce8e22169032100d4260614fc3da435025ff389ef1d396a433/pip-20.2.4-py2.py3-none-any.whl (1.5MB)

    100% |████████████████████████████████| 1.5MB 1.1MB/s

Installing collected packages: pip

  Found existing installation: pip 9.0.3

    Uninstalling pip-9.0.3:

      Successfully uninstalled pip-9.0.3

Successfully installed pip-20.2.4

-- Executing: ['/root/lib/oracle-cli/bin/pip', 'install', '--cache-dir', '/tmp/tmpz92don2q', 'wheel', '--upgrade']

Collecting wheel

  Downloading wheel-0.35.1-py2.py3-none-any.whl (33 kB)

Installing collected packages: wheel

Successfully installed wheel-0.35.1

-- Executing: ['/root/lib/oracle-cli/bin/pip', 'install', '--cache-dir', '/tmp/tmpz92don2q', 'oci_cli', '--upgrade']

Collecting oci_cli

  Downloading oci_cli-2.14.5-py2.py3-none-any.whl (12.2 MB)

     |████████████████████████████████| 12.2 MB 29.7 MB/s

Collecting configparser==4.0.2

  Downloading configparser-4.0.2-py2.py3-none-any.whl (22 kB)

Collecting jmespath==0.10.0

  Downloading jmespath-0.10.0-py2.py3-none-any.whl (24 kB)

Collecting terminaltables==3.1.0

  Downloading terminaltables-3.1.0.tar.gz (12 kB)

Collecting PyYAML==5.1.2

  Downloading PyYAML-5.1.2.tar.gz (265 kB)

     |████████████████████████████████| 265 kB 53.6 MB/s

Collecting retrying==1.3.3

  Downloading retrying-1.3.3.tar.gz (10 kB)

Collecting arrow==0.14.7

  Downloading arrow-0.14.7-py2.py3-none-any.whl (39 kB)

Collecting click==6.7

  Downloading click-6.7-py2.py3-none-any.whl (71 kB)

     |████████████████████████████████| 71 kB 14.0 MB/s

Collecting certifi

  Downloading certifi-2020.11.8-py2.py3-none-any.whl (155 kB)

     |████████████████████████████████| 155 kB 58.5 MB/s

Collecting cryptography==2.8

  Downloading cryptography-2.8-cp34-abi3-manylinux2010_x86_64.whl (2.3 MB)

     |████████████████████████████████| 2.3 MB 55.0 MB/s

Collecting python-dateutil<3.0.0,>=2.5.3

  Downloading python_dateutil-2.8.1-py2.py3-none-any.whl (227 kB)

     |████████████████████████████████| 227 kB 58.8 MB/s

Collecting pyOpenSSL==18.0.0

  Downloading pyOpenSSL-18.0.0-py2.py3-none-any.whl (53 kB)

     |████████████████████████████████| 53 kB 3.4 MB/s

Collecting oci==2.23.5

  Downloading oci-2.23.5-py2.py3-none-any.whl (7.0 MB)

     |████████████████████████████████| 7.0 MB 56.1 MB/s

Collecting pytz>=2016.10

  Downloading pytz-2020.4-py2.py3-none-any.whl (509 kB)

     |████████████████████████████████| 509 kB 54.4 MB/s

Collecting six==1.14.0

  Downloading six-1.14.0-py2.py3-none-any.whl (10 kB)

Collecting cffi!=1.11.3,>=1.8

  Downloading cffi-1.14.3-cp36-cp36m-manylinux1_x86_64.whl (400 kB)

     |████████████████████████████████| 400 kB 53.1 MB/s

Collecting pycparser

  Downloading pycparser-2.20-py2.py3-none-any.whl (112 kB)

     |████████████████████████████████| 112 kB 57.6 MB/s

Building wheels for collected packages: terminaltables, PyYAML, retrying

  Building wheel for terminaltables (setup.py) ... done

  Created wheel for terminaltables: filename=terminaltables-3.1.0-py3-none-any.whl size=15354 sha256=0cf6900d9dfed08a4e0293fd8512f72826a84b1c6274ea3731483ed4e6dc629e

  Stored in directory: /tmp/tmpz92don2q/wheels/86/1b/58/c23af2fe683acd8edc15d5a1268f0242be1ff2cf827fe34737

  Building wheel for PyYAML (setup.py) ... done

  Created wheel for PyYAML: filename=PyYAML-5.1.2-cp36-cp36m-linux_x86_64.whl size=44103 sha256=1c65acd68ee2de5ced16ea5f324d712abe64db6182faee6340ad99e09898f98a

  Stored in directory: /tmp/tmpz92don2q/wheels/d8/9b/e7/75af463b873c119dd444151fc54a8e190c87993593e1fa194a

  Building wheel for retrying (setup.py) ... done

  Created wheel for retrying: filename=retrying-1.3.3-py3-none-any.whl size=11429 sha256=ff8a9a128387ab5cd201fe604ed39460f39d91f7e4b4672aa5cd0b6eb5106354

  Stored in directory: /tmp/tmpz92don2q/wheels/ac/cb/8a/b27bf6323e2f4c462dcbf77d70b7c5e7868a7fbe12871770cf

Successfully built terminaltables PyYAML retrying

Installing collected packages: configparser, jmespath, terminaltables, PyYAML, six, retrying, python-dateutil, arrow, click, certifi, pycparser, cffi, cryptography, pyOpenSSL, pytz, oci, oci-cli

Successfully installed PyYAML-5.1.2 arrow-0.14.7 certifi-2020.11.8 cffi-1.14.3 click-6.7 configparser-4.0.2 cryptography-2.8 jmespath-0.10.0 oci-2.23.5 oci-cli-2.14.5 pyOpenSSL-18.0.0 pycparser-2.20 python-dateutil-2.8.1 pytz-2020.4 retrying-1.3.3 six-1.14.0 terminaltables-3.1.0


===> Modify profile to update your $PATH and enable shell/tab completion now? (Y/n): Y


===> Enter a path to an rc file to update (file will be created if it does not exist) (leave blank to use '/root/.bashrc'):

-- Backed up '/root/.bashrc' to '/root/.bashrc.backup'

-- Tab completion set up complete.

-- If tab completion is not activated, verify that '/root/.bashrc' is sourced by your shell.

--

-- ** Run `exec -l $SHELL` to restart your shell. **

--

-- Installation successful.

-- Run the CLI with /root/bin/oci --help

[root@server1]# exec -l $SHELL


Step 2.

Setup OCI configuration:-

Before setting up OCI configuration , we would require following information such as OCI user OCID, tenancy OCID, Compartment OCID , region etc.

To find out OCI user OCID


Take a note of user OCID


To find out tenancy OCID


Take a note of Tenancy OCID


To find out compartment id


Select the compartment where the oci instance belongs to.


 [root@ccuine23 ~]# /root/bin/oci setup config

    This command provides a walkthrough of creating a valid CLI config file. 

    The following links explain where to find the information required by this

    script: 

    User API Signing Key, OCID and Tenancy OCID: 

        https://docs.cloud.oracle.com/Content/API/Concepts/apisigningkey.htm#Other

     Region:

         https://docs.cloud.oracle.com/Content/General/Concepts/regions.htm

     General config documentation:

         https://docs.cloud.oracle.com/Content/API/Concepts/sdkconfig.htm


Enter a location for your config [/root/.oci/config]:

Enter a user OCID: ocid1.user.oc1..************************************** cjgrq

Enter a tenancy OCID: ocid1.tenancy.oc1..***************************************4mq

Enter a region (e.g. ap-chiyoda-1, ap-chuncheon-1, ap-hyderabad-1, ap-melbourne-1, ap-mumbai-1, ap-osaka-1, ap-seoul-1, ap-sydney-1, ap-tokyo-1, ca-montreal-1, ca-toronto-1, eu-amsterdam-1, eu-frankfurt-1, eu-zurich-1, me-dubai-1, me-jeddah-1, sa-saopaulo-1, uk-cardiff-1, uk-gov-cardiff-1, uk-gov-london-1, uk-london-1, us-ashburn-1, us-gov-ashburn-1, us-gov-chicago-1, us-gov-phoenix-1, us-langley-1, us-luke-1, us-phoenix-1, us-sanjose-1): ap-mumbai-1

Do you want to generate a new API Signing RSA key pair? (If you decline you will be asked to supply the path to an existing key.) [Y/n]:Y

Enter a directory for your keys to be created [/root/.oci]:Press Enter

Enter a name for your key [oci_api_key]:Press Enter

Public key written to: /root/.oci/oci_api_key_public.pem

Enter a passphrase for your private key (empty for no passphrase):Press Enter

Private key written to: /root/.oci/oci_api_key.pem

Fingerprint: 9f:b9:49:35:01:6f:37:38:07:03:5f:c9:24:13:6a:64

Config written to /root/.oci/config


    If you haven't already uploaded your API Signing public key through the

    console, follow the instructions on the page linked below in the section

    'How to upload the public key':


        https://docs.cloud.oracle.com/Content/API/Concepts/apisigningkey.htm#How2


Step 3.

Once configuration is done, go to the path where the public key has been created in the server.

Add compartment_id in the config file.

 [root@server1]# vi /root/.oci/config

compartment_id=ocid1.tenancy.oc1..**********************xhuxifteoynzcrkhheeja5c5vtrv7fhy5wefxq


Upload the file oci_api_key_public.pem into oci.

[root@server1]# cd /root/.oci/

 [root@server1]# cat oci_api_key_public.pem

-----BEGIN PUBLIC KEY-----

MIIBIjANBgkqhkiG9w0BAQEFAAOCAQ8AMIIBCgKCAQEAp0rjYTvNRnql87jbQCnJ

9ARiS/rb3oCrUziSeAHaDrGwS+mNM0GNdlLCUbLuaZDR+vZHLmGZGD8

hyYPNW1K7dduG3SRsGKjILm75ioeHYFgi1bldPD16lc2emt0q4/OtdDqbMUlqj12

bllYY0cSfVFTJzdnK/Fcb3YGg2UW3Pk3CDdyed+eE2HnGfPauu3Nh84djSkhJ9Yj

aRH4BC0pCPRU/XwCHyfkZpCpQrOEvdkgoaEjF1C8dwNMcIINCcWCNSOTbxvPyma4

2k+wZcmysR3TQBs8+5Ww5+UtcaVUbuPh9RHd1Ch6Eas6woxHxEoaHYlNDS4jL8Sn

XQIDAQAB

-----END PUBLIC KEY-----


Login to OCI console


Under Resources select the option API Keys


Click on Add Public key option and paste the public key which was generated earlier .


Step 4

Testing the configuration:-

From the on premise instance run the following command to test the connectivity.

 [root@server1]# /root/bin/oci iam user api-key list --user-id ocid1.user.oc1..aaaaaaaadluyrev22yy5tbffzysx3wps6anbp7y3mkd3oqgkv24q7wycjgrq

{

  "data": [

    {

      "fingerprint": "9f:b9:49:35:01:6f:31:38:07:03:5f:c9:24:13:6a:64",

      "inactive-status": null,

      "key-id": "ocid1.tenancy.oc1..aaaaaaaaicv6vyqwreetlbdyf4fgghm75wottdro6ito5xg4mq/ocid1.user.oc1..aaaaaaaadluyrev22yy5tbffzysx3wpwerp7y3mkd3oqgkv24q7wycjgrq/9f:b9:49:35:01:6f:37:38:07:03:5f:c9:24:13:6a:64",

      "key-value": "-----BEGIN PUBLIC KEY-----\nMIIBIjANBgkqhkiG9w0BAQEFAAOCAQ8AMIIBCgKCAQEAp0rjYTvNRnql87jbQCnJ\n9ARiS/rb3oCrUziSeAHaDrGwS+mNFkF+M5RJeM0GNdlLCUbLuaZDR+vZHLmGZGD8\nhyYPNW1K7dduG3SRsGKjILm75ioeHYFgi1bldPD16lc2emt0q4/OtdDqbMUlqj12\nbllYY0cSfVFTJzdnK/Fcb3YGg2UW3Pk3CDdyed+werewr/XwCHyfkZpCpQrOEvdkgoaEjF1C8dwNMcIINCcWCNSOTbxvPyma4\n2k+wZcmysR3TQBs8+5Ww5+UtcaVUbuPh9RHd1Ch6Eas6woxHxEoaHYlNDS4jL8Sn\nXQIDAQAB\n-----END PUBLIC KEY-----",

      "lifecycle-state": "ACTIVE",

      "time-created": "2020-11-16T08:49:24.642000+00:00",

      "user-id": "ocid1.user.oc1..aaaaaaaadluyrwer43wps6anbp7y3mkd3oqgkv24q7wycjgrq"

    }

  ]

}


From the above output it shows the connection is successful.


Step 5.

Uploading objects into OCI object store:-

Before uploading the objects  ,we need to create an object storage in OCI


Click on Create bucket


Provide details for bucket creation.


Take a note of namespace value.


Now lets upload files from on premise machine.


[root@server1 upload]$mkdir /test/bkp/upload

[root@server1 upload ]touch xyz

Use the following command to upload the objects into object storage

oci os object put -ns <object_storage_namespace> -bn <bucket_name> -–file <file_location>


[root@ccuine23 .oci]# oci os object put -ns bm64se5fa0a -bn test_bucket --file /test/bkp/upload/xyz

Uploaded xyz  [####################################]  100%


{

  "skipped-objects": [],

  "upload-failures": {},

  "uploaded-objects": {

    "xyz": {

      "etag": "699c6a97-6124-4da9-b801-01360e99a364",

      "last-modified": "Mon, 16 Nov 2020 09:21:03 GMT",

      "opc-content-md5": "1B2M2Y8AsgTpgAmY7PhCfg=="

    }

  }

}


Bulk Upload of all files inside a directory:-

oci os object bulk-upload -ns bm626zuufa0a -bn test_bucket --src-dir /test/bkp/upload


So this concludes the process of uploading files from on prem machine to OCI object storage.

How to create Refreshable Clone on Autonomous Database

 One of the most widely used features in Autonomous Database on Shared Infrastructure (ADB-S) today is the ability to clone your database. This feature enables you to clone your source database easily and create another environment which can be used for development or testing purpose.

There are three types of cloning methods available in ADB such as


  • Full Clone – This creates a new database with the source database’s data & metadata.
  • Refreshable Clone – This creates a read only copy of the source database’s data and metadata.  This can be refreshed with source database’s data periodically as per requirement
  • Metadata Clone –    This creates a new database with only metadata of source database. 


Here in this topic I would be talking about Refreshable Clone on Autonomous Database. 


Refreshable Clone Features:-

A refreshable cloned instance is a read-only database, which basically stays connected with the source instance and when required it can pull data from the source instance just by simply clicking on “Refresh Clone” button. The entire cloning operating can take place without knowing much of cloning process nitty gritty.

The refreshable clone has a one week (7 days) refresh age limit. If once do not perform a refresh on the refreshable cloned instance, the cloned instance would no longer be refreshable further. However, the instance can be disconnected from source database and open the database as read write mode.


Step 1: Setting up an Autonomous Database

Login to OCI console.

Lets assume we already have an Autonomous Database created. Here in our demo we are using one Autonomous Transaction Processing database namely ATP-PROD


Navigate to Tools, and open SQL Developer Web. We can use SQL Developer which if its available on your local PC. Just make sure the connection towards the ATP-D is working properly. From SQL Developer we would firstly make some changes into the database.


Provide username: Admin and password to login into SQL Developer Web


Now that we have created a table, and inserted data into it. Lets start the cloning process


Step 2. Creating Refreshable Clone from Autonomous Database


Navigate to More Actions -> Click on “Create Clone” option.


Here Select the clone type as “Refreshable Clone” and for display name choose a name as per your convenience. In our case we chose Clone of ATP-PROD.


For Database name we choose a name UAT. Note:The cloned refreshable instance name cant be same as source database’s  name in same OCI region.


Choose the desired Network access type. In our case we choose “Allow secure access from everywhere”. If there is a VCN configured, this can be used as well for private access.

Choose a license type. We choose BYOL in our case.

Note:- For refreshable clone , there is no ADMIN password option available, as the password is inherited from the source database.


Step 3: Insert additional data into the source database

Now once refreshable clone instance is created open the 

SQL developer Web and lets check the data


So we can see the data has been cloned successfully into the refreshable cloned instance. Now let’s insert few more rows into source instance.


Step 4: Refresh the clone instance to view the data


Now here in the above screenshot it clearly shows the time by which cloned instance must be refreshed, else the instance won’t be able to refreshed further


While we hit the “Refresh Clone” button it asks for timestamp from where instance would get refreshed. In our case , we provided the timestamp after the time when we added a row into the table in source instance.


So after querying the table t1 from refreshable instance , we can see the data has been updated into the refreshable cloned instance.


So this concludes the testing of refreshable cloned feature in autonomous database.


Good To Know: -

  • Ø  Oracle ADB refreshable clone feature is not available in Always Free Autonomous database.

  • Ø  The Oracle ADB refreshable clone feature is available from Oracle Database 19c onwards in OCI.

  • Ø  To create a refreshable clone, the source database workload type must be either ATP (Autonomous Transaction Processing) or ADW (Autonomous Data Warehousing). Creation of refreshable clone from Autonomous JSON Database is not supported.

  • Ø  It is not possible to create a refreshable clone from another refreshable clone. But creation of  a full or Metadata clone is possible.

  • Ø  If its required to change the ADMIN password in refreshable clone, this must be done on source database followed by a refresh, which would eventually change the ADMIN password in the clone instance

  • Ø  Oracle Machine Learning is disabled in a refreshable clone read-only database. In addition, the OML User Administration URLs are disabled in the Oracle Cloud Infrastructure console and in the Autonomous Database Service Console.

  • Ø  Oracle APEX URL’s do not work in a refreshable clone, as the database runs in read/write mode. The APEX URL’s are disabled in OCI Console and Autonomous database Service Console. The URL are enabled when the database is open in read write mode when the cloned instance is disconnected from source database.

  • Ø  You cannot rename a refreshable cloned instance or database


Business cases where the Refreshable clone can be implemented: -

·            Ã˜  Providing a routinely updated clone to a different business unit within your organization for             reporting and analysis

  • Ø  Creating billing or workload separation for your databases between business units within the organization

  • Ø  Providing up-to-date read-only test database environments to internal teams